At the NVIDIA GTC conference, VIAVI announced it is expanding its TeraVM AI RAN Scenario Generator (AI RSG) product by integrating it with the NVIDIA Aerial Omniverse Digital Twin (AODT). The integration enables realistic and detailed radio access network (RAN) simulations, supporting network equipment manufacturers to leverage network data and AI/ML to optimize network operations.
In this blog, we’ll showcase the integration of VIAVI’s AI RSG with NVIDIA AODT. This powerful combination allows for the creation of highly realistic, AODT-compatible scenarios that can be rendered with stunning detail using NVIDIA raytracing rechnology. We’ll walk through the steps of creating a scenario with VIAVI AI RSG, exporting it to AODT, and rendering it in AODT, complete with screenshots to illustrate each step.
Step 1: Creating an AODT-Compatible Scenario with VIAVI AI RSG
The first step in our integration process is to create a realistic RAN scenario using VIAVI AI RSG. This tool allows you to simulate system-level RAN behavior, creating a digital twin that mirrors real-world conditions. Here’s how you can get started:
1. Enable AODT integration: This is one of the top options in VIAVI AI RSG Scenario Generation.

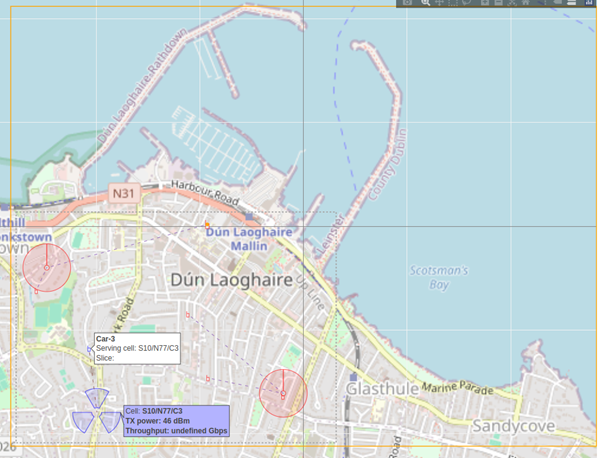
2. Import Real-World Map: Begin by importing real-world maps with streets, buildings, and network configurations into the AI RSG. This sets the stage for a realistic simulation environment.

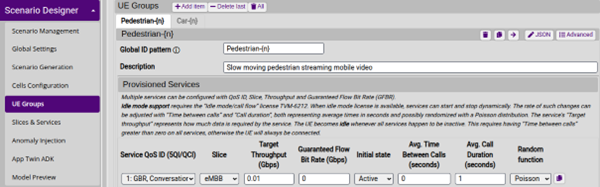
3. Create UE Profiles: Define user equipment (UE) profiles that simulate movements, handovers, and resource requests. This helps in creating dynamic and realistic network scenarios. In this case we are asking VIAVI AI RSG to place pedestrians and cars around the streets in the town center.
Step 2: Exporting the Scenario to AODT
Once your scenario is ready in VIAVI AI RSG, the next step is to export it to NVIDIA Aerial Omniverse Digital Twin. This will happen automatically when saving an RSG simulation. Click here for more information about installation.
Behind the scenes, VIAVI AI RSG is invoking AODT Scene Importer tool, pointing it to the area of interest, then exporting the locations of UEs and antennas into Clickhouse database. With the scenario data exported, it’s then rendered in AODT. AODT leverages NVIDIA RTX technology to provide highly detailed and realistic visualizations. Follow these steps:
1. Import Scenario Data: Import the exported scenario data into AODT. This involves loading the generated Universal Scene Description (USD) file into the AODT environment and configuring the simulation parameters. Note that in this case we scaled up the representation of radio units (RUs) and UEs, to find them easily in this city-scale scenario.
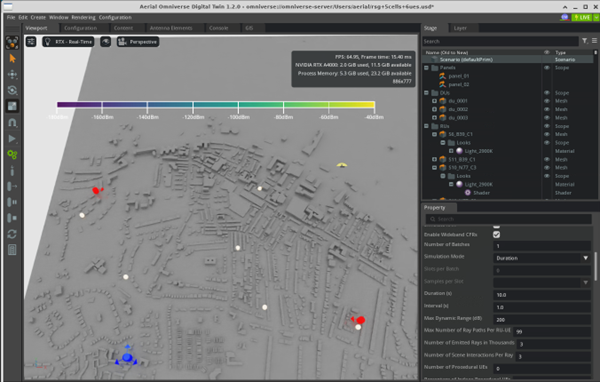
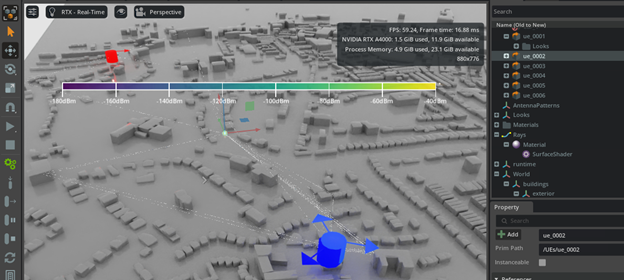
2. Configure Raytracing Settings: Adjust the raytracing settings in AODT to achieve the desired level of detail and realism. In this case I am drastically reducing the number of ray paths and their interactions, to be able to render the whole scene in real time on a medium range GPU: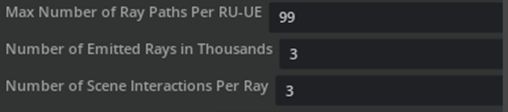
3. Run the Simulation: Execute the simulation in AODT. The platform will use raytracing to render the scenario, providing a visually stunning representation of the RAN environment.
Conclusion
Integrating VIAVI AI RAN Scenario Generator with NVIDIA Aerial Omniverse Digital Twin opens new possibilities for realistic and detailed RAN simulations. By following the steps outlined in this blog, you can create, export, and render from VIAVI AI RSG.
Stay tuned for the next step, where we will be importing raytracing results into VIAVI AI RSG for increased realism in RSG KPIs.
Check out NVIDIA’s blog on “Developing Next-Generation Wireless Networks with NVIDIA Aerial Omniverse Digital Twin” here.


